
Attaching recordings to your songs
TL;DR
If you have any recordings for a song, such as a commercial recording you're learning a cover from, or a backing track you perform with, you can add those on the song edit pages (Repertoire > Songs), then easily play them them while rehearsing or performing.
You can watch a tutorial video, or read on for details.
The steps for adding recordings are slightly different between the website and the apps:
Adding individual recordings to BandHelper from the website
- Click the Edit button for a song.
- Click the Add Recordings button.
- The recording edit page appears in a popup window. Click the file selection button, then browse to the file on your computer and select it. The file name will be copied into the Name field automatically, but you can enter a different name if needed.
- If you only want some users to see this recording, select the desired users.
- Click Save in the edit window to add the recording to your account and attach it to this song. The popup will close and the recording name will appear on the edit page.
- If your recording is too large to upload and download easily, or exceeds the file size limit, click the Copy To Devices Manually option in the edit window. Then you can install the recording directly into BandHelper's data folder on your devices.
- You can repeat these steps to add more recordings, then drag and drop to rearrange them. Then click Save on the edit page.
- If you want to attach a recording that you have already added to your account, you can click Add Existing Recordings in the edit window and then select from the list of existing recordings.
- If you want to update a recording that you have already added to your account, it's usually best not to delete the existing recording and add it again. Instead, you can edit the recording, click the file selection button, then select the updated file to replace it. This preserves the recording's settings.
Adding individual recordings to BandHelper from the iOS, Android or macOS app
- Navigate to the Songs list and click an item to edit it.
- Click the Add Recordings button.
- The recording edit page appears in a popup window. Click the File button, then you can browse and select a file from any location your device can access, including local or cloud folders. Alternatively, you can click the iTunes button to import a recording from your music library (iOS/macOS only). If you want to use a file from another app, you might need to export it from that app to a folder, then select the exported file in this step. On iOS, you can export it to BandHelper's data folder, but in that case, BandHelper will ask if you want to replace the file when you select it and you can choose Replace.
- After selecting a file, the file name will be copied into the Name field automatically, but you can enter a different name if needed.
- If you only want some users to see this recording, select the desired users.
- Click Save in the edit window to add the recording to your account and attach it to this song. The popup will close and the recording name will appear on the edit page.
- If your recording is too large to upload and download easily, or exceeds the file size limit, click the Copy To Devices Manually option in the edit window. Then you can install the recording directly into BandHelper's data folder on your other devices.
- You can repeat these steps to add more recordings, then drag and drop to rearrange them.
- If you want to attach a recording that you have already added to your account, you can click Add Existing Recordings in the edit window and then select from the list of existing recordings.
- If you want to update a recording that you have already added to your account, it's usually best not to delete the existing recording and add it again. Instead, you can edit the recording, click the File button, then select the updated file to replace it. This preserves the recording's settings.
Adding a batch of recordings to BandHelper from the website
- Zip your recordings together into a file up to 500MB in size.
- Log into the website and go to the Recordings page of the Repertoire section.
- Click the Batch Import form at the top of the page and select your zip file.
- To only attach recordings to existing songs, leave Add New Songs deselected. To create new songs for any recordings in the zip file that don't match an existing recording or song name, select Add New Songs.
- Click Submit. This will upload all the files, which could take up to an hour depending on your Internet connection.
When the upload is complete, BandHelper will…
- Replace existing recordings that have the same name.
- Attach new recordings to a song with the same base name. For example, a recording named "Freebird - no drums.mp3" will be attached to a song named "Freebird."
- Add a new song for any recordings whose names don't match any existing items, if Add New Songs is selected.
The capabilities for playing recordings are slightly different between the website and the apps:
Playing recordings from the website
After you've attached a recording to a song, you should see a
recording button ![]() appear
next to that item whenever it appears.
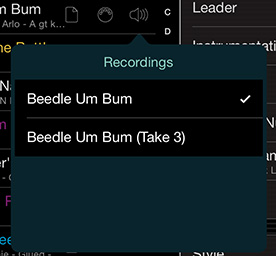
Clicking the button plays the default recording, which is the first one in
the list for that song. If you have attached more than one recording,
you can click and hold the button until a submenu appears, then
click the desired recording name.
appear
next to that item whenever it appears.
Clicking the button plays the default recording, which is the first one in
the list for that song. If you have attached more than one recording,
you can click and hold the button until a submenu appears, then
click the desired recording name.
Recordings you play in the website have the following features:
- A toolbar will appear with controls for skipping to the previous or next recording, pausing and playing, skipping to a different playback location or downloading the file to your computer. If you pause the recording from the toolbar, the toolbar will remain on the screen; if you stop the recording by tapping its icon again, the toolbar will close.
- When one recording finishes, the next one will play automatically and this will continue until the end of the list. You can use this feature to set up a set list, then preview the set list by playing through it continuously.
- You can also control recordings with keyboard shortcuts: the right and left arrow keys skip to the next and previous recordings, the up and down arrow keys control the volume, the space bar pauses and resumes playback and the escape key closes the recording toolbar. (You might have to click the recording toolbar before the keyboard messages are correctly routed to the recording.)
Playing Recordings from the iOS, Android or macOS app
After you've attached a recording to a song, you should see a
recording button ![]() appear
when you view the song.
Tapping the button plays the default recording, which is the first one in
the list for that song (unless you change Settings > General > Defaults > Recording). If you have attached more than one recording,
you can tap and hold the button until a submenu appears, then
tap the desired recording name.
appear
when you view the song.
Tapping the button plays the default recording, which is the first one in
the list for that song (unless you change Settings > General > Defaults > Recording). If you have attached more than one recording,
you can tap and hold the button until a submenu appears, then
tap the desired recording name.
Recordings you play in the app have the following features:
- In the Repertoire > Recordings list, a recording toolbar will appear at the bottom of the list. This toolbar will also appear in the set list view if the recording controls are included in the current layout.
- You can add markers to a recording by clicking the Markers button in the recording controls when the recording playback is at the desired location. Then you can tap and hold the Markers button and select a marker to jump to it.
- If multiple recordings are attached to the song, you can tap and hold the play/pause button in the recording controls to switch to any of the attached recordings.
- The recording toolbar will include a second row with skip, loop and speed controls in the set list view, if it is sized large enough in the layout. You can adjust the skip amounts at Settings > Audio & MIDI > Recording Skip Amount. You can tap the loop buttons to set start and end points, and tap them again to turn off the looping. You can slide the speed control to change the playback speed, and double-tap it to return to the normal speed.
- By default, the audio will stop when you change songs. If you want to preview different songs while a recording for the current song is still playing, you can turn on Settings > Audio & MIDI > Continue Audio When Changing Songs. However, the audio will still stop if you leave the set list view.
By default, BandHelper waits at the end of a song for you to select the next song. But you can configure it to auto-advance through songs based on the song's recording, video, automation track or duration:
- To set this up, you can go to Settings > App Control and turn on Auto-Advance Through Songs. Now BandHelper will automatically select the next song when the current song finishes playing its recording, its video or its automation track. If more than one of these is playing, it will wait until the last one finishes. If you aren't using any of these timing functions, you can turn on Settings > Advanced > General > Trigger Song Completion From Duration and set the Duration field for each song.
- To make BandHelper continually auto-advance through multiple songs, you can automatically start the timing function on each selected song. For example, if you're using recordings to determine the song timing, you can go to Settings > App Control > Actions > Add An Action > Recordings > Start Recording and select Layout Actions > Song Selection. Alternatively, you can select Layout Actions > Song Auto-Selection and then the recording will only play when auto-advancing through the songs, not when manually selecting a song. With either option, when a recording ends, the next song will be selected, which will trigger the next song's recording, and the cycle will continue.
- To start the auto-advancing, you can start the timing function for the first song. You can do that by selecting the song if you used the Song Selection layout action, or by clicking the button for that function (e.g., the recording button) if you used the Song Auto-Selection action.
- Auto-advancing will stop when the next song is a break or a pause, so you can use pauses to divide your songs into groups that are selected automatically. Alternatively, if you only want to auto-advance between a few pairs of songs, you can add links between those songs, and turn on the Only Between Linked Songs setting under the Auto-Advance Through Songs setting.
- If you're auto-advancing through songs in a performance, you might need a small delay between songs, so the Auto-Advance Through Songs setting won't select the next song until after the Time Between Songs, from the set list's Edit Details page. On the other hand, if you're auto-advancing through songs to preview them while preparing for a performance, you probably won't want that delay, so you can turn on the Ignoring Time Between Songs setting under the Auto-Advance Through Songs setting.
- Since you might want to auto-advance in some situations but not others -- like when previewing a set list while driving to a gig, but not when performing at the gig -- you can add a layout button to quickly turn that setting on or off. From your layout's Edit Details page, you can turn on Top Toolbar Buttons > Auto-Advance. Then a button will appear in the top toolbar that you can click to toggle Auto-Advance on and off. Alternatively, you can go to Settings > App Control > Actions > Add An Action > Other > Start/Stop Auto-Advance and select a trigger like a layout gesture or foot switch button to toggle Auto-Advance on and off. BandHelper checks the Auto-Advance Through Songs setting only at the end of each song, so you can turn it on or off during a song to change what will happen at the end of that song.
- The iOS app can play .mp3, .mp4, .m4a, .aac (in an .mp4 or .m4a container), .aif, .aiff, .aifc, .wav and .mid files, but it cannot play DRM-protected files like "Protected AAC" files purchased from the iTunes Music Store. In iTunes, you can convert these files to unprotected MP3 or AAC files and attach those versions to your songs. The Android app can play .mp3, .mp4, .m4a, .aac, .wav, .ogg, .flac and .mid files. The website can play whatever files are supported natively by your web browser; this should include .mp3, .mp4 and .m4a files and might also include .aac, .wav and .ogg files.
- If you have a recording that you want to access from any song, such as a sound logo for your band, you can turn on the Pinned To All Songs option on its edit page. Then the recording will always be available from the recording button as if it is attached to every song. If you include the Multiple Recording Buttons in your layout, you can set that to show only the song recordings, only the pinned recordings or both (the default is both).
- On iOS, you can optionally play two recordings at once, and if you connect a USB audio interface to your device, you can route each recording to a different output port. This is useful for sending a backing track to a house mix and a click track to a monitor mix. To play two recordings at once, turn on Settings > Audio & MIDI > Audio Options > Play First Two Recordings Together. To route the recordings to different output ports, select the ports in Settings > Audio & MIDI > Audio Options > Recording 1/2 Output Port.
- Your song layouts can include an on-screen volume slider, which controls the volume for any audio generated by BandHelper. This is different than the overall device volume, which you can control using the hardware buttons on the side of your device. If you move the volume slider to the left or right of the middle position, BandHelper's audio will play softer or louder compared to other apps. You can double-tap the volume slider to return to the default, middle position. You can also adjust the app volume on the fly by assigning a remote control device such as a Bluetooth or MIDI foot switch to the Volume Up and Volume Down app control actions.
- If your recordings come from different sources and have different volume levels, you can save a volume override value for each recording. Navigate to the Repertoire menu for your database, then tap Recordings, then tap the name of a recording and use the stepper buttons to raise or lower the playback volume.
- Similarly, you can set the panning of a recording with the Pan slider on the recording edit page. Panning a stereo recording doesn't mean that sound from one channel will move to the other channel; it simply means that the relative volume of the two channels will be adjusted.
- If you are practicing with a recording, you can change its pitch, to play in a different key or adjust for an out-of-tune recording. See the Advanced Audio page for more info.
- If you're using backing tracks in performance and want to smoothly end a song, you can set a value for Settings > Audio & MIDI > Fade Out Recordings. Then when you click the button to stop a playing recording, it will fade out over that duration rather than stopping immediately. If you want to stop it immediately, you can click a second time.
Tutorials